Instructions for the UTAX Print app & new self-service printers
IMPORTANT
- For printing and using the webpage or the APP you MUST be in the WLAN network of the university! (VPN possible).
- An account is required for printing via the printers in the self-service area.
- Here you can find the instructions as PDF
Kurzanleitungen:
Open browser:
- Go to asta-print.upb.de
Create an account:
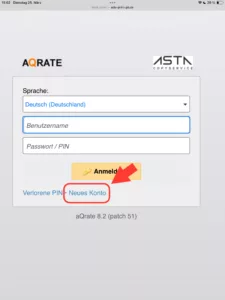
- Select “Neues Konto” at aQrate
- Register
Recieve PIN:
- An 8-digit PIN will be automatically sent to your Mail address
- Make sure to note down this PIN, you will need it soon!
Login:
- Username (Benutzername): Your E-Mail address you used for registration
- PIN: The 8-digit PIN received by Mail
Top up your credit:
- Directly via PayPal
- In person at our service centre with cash or card

Go to „Cloud-Speicher“.
- Select OneDrive or Google Drive and follow the instructions.
- Once successfully connected, you will have direct access to your documents from your cloud

Log in:
- Log in with your login details at asta-print.upb.de
Top up credit:
- Go to „Guthaben aufladen“ and top up your credit via PayPal.
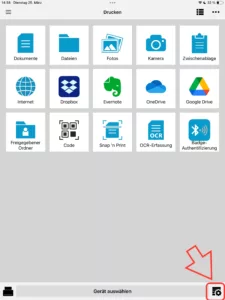
Create print job:
- Go to „Datei drucken“.
- Select a file you want to print and upload it with your desired print settings.
Print:
- Go to one oft he printers.
- Log in using your 8-digit PIN.
- Decide whether you want to:
- „Print all“ (Drucke alles): All uploaded files are printed immediately
- „My print jobs“ (Meine Druckaufträge): Select and print individual uploaded files.
Copy & scan:
- Make copies (also for ID cards [ID card, passport, health insurance card, etc.]).
- Scan documents directly to your email address or to your connected drive.
- Go to asta-print.upb.de
- Log in using your login details.
- Create a password. (From now on, you can also use this to log in to the astaprint.upb.de website together with your username instead of the 8-digit PIN) You will still need the 8-digit PIN to log in to the printer.

- Now you can also connect your aQrate account to the UTAX Print app.
- Download the TA/UTAX Print app from the Appstore
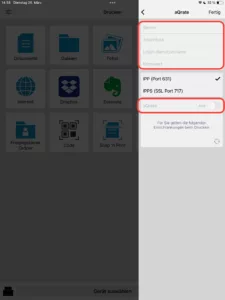
- Open the app and go to Settings (gear wheel at the bottom right)
- The print settings will open, scroll to the bottom and select aQrate
- Server: asta-print.upb.de
- Anschluss: 9094
- Login-Benutzername: your username
- Kennwort: your newly assigned password
- Activate the aQrate slider and save with “Fertig”
- Select Printer:
- Select a printer at the bottom centre of the app home screen
- Always select Follow Me
- Initial setup on the printer:
- Log in to the printer with your 8-digit PIN the first time you use the printer.
- Badge-Authentication:
- Open the menu item ‘Badge authentication’ in the UTAX Print app on your mobile phone and select ‘ID card registration’ on the printer.
- Hold your mobile phone (or alternatively an NFC-enabled device such as a DeliCard/city campus card) up to the printer sensor to deposit it.
- In future, you will only need to hold the device in front of you – no PIN entry required.
- On your mobile phone, you must have ‘badge authentication’ open in the UTAX Print app in order to log in to the device with your mobile phone.

- Print jobs via the App:
- Control your print jobs and upload files from your mobile phone (GoogleDrive, OneDrive – Cloud must be set to www.asta-print.de in advance, but can then also be used via the app).
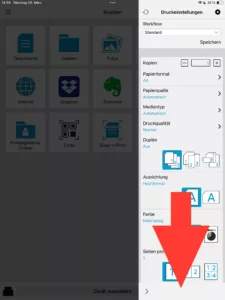
- Edit print settings (colour printing/black and white, single or double-sided, number of copies, etc.) in the app.
- Note: You must specify the page range you want to print in the app beforehand; it can no longer be changed on the printer. (Example: you have a document with 20 pages and only want to print pages 1-7).
- Costs & billing:
- The printing costs are automatically deducted from your account.
- Cancel your print:
- If you want to cancel printing, log out using the lock symbol.
- You will only be charged for what has already been printed; to continue, you must upload the job again.
Alternative per Mail:
- Send your documents to (be sure to use the same email address that you entered on asta-print.upb.de).
- By default, prints sent by email are printed on one side and in colour.
- Use the following hashtags in the subject line for other printing instructions when printing by email:
- For colour printing: #farbe
- For b/w printing: #mono
- For single-sided printing: #simplex
- For double-sided printing: #duplex
- After logging in to the printer, your sent jobs will appear automatically and you can start printing
- Log in to asta-print.de with your login details.
- Click on “Top up credit” under the menu item “Home” and top up your account via PayPal.

If topping up the credit via PayPal does not work, please check the pop-up settings:
- Open the settings of your device.
- Go to All apps and search for the browser (e.g. Safari) you are using.
- Deactivate the Block pop-ups option.
- The top-up via PayPal should then work as described.